Jazz Reporting Solutions – Getting started and deep dive material – Update

This post is about the Jazz Reporting solutions and how to quickly find some information to help grow your knowledge or just get started. The Jazz Reporting solutions as of CLM v6.0.2 consist of the IBM Jazz Reporting Service(JRS), Rational Publishing Engine, ALM Cognos Connector and Rational Insight.  The Jazz Reporting Service is made up of the following components: Report Builder, Data Collection Component (DCC), and Lifecycle Query Engine (LQE).  The JRS started as the Report Builder and DCC in version 5.0. JRS is an alternative to complex reporting solutions. It can be used to quickly create reports to share information about your lifecycle management products with stakeholders, and fellow team members.

The best sources of information on this topic are as follows: the IBM Knowledge Center, Jazz.net library, and the IBM User Education channel on YouTube.  I have compiled a list that you can reference as a consumer, business partner, technical salesperson or just a curious reporting enthusiast.

IBM Knowledge Center

JRS Ready-to-use and Ready-to-copy Reports
Data Dictonaries
Reportable REST API

Jazz.net

Youtube

JRS

V6.02

Reporting on versioned artifacts

V6.0

V5.0.2


Rational Publishing Engine (RPE)

RPE 2.0.1 Video Series


IBM Interconnect 2015: Feb 22-26, Las Vegas – Where can you find me?

Interconnect2015

IBM Interconnect 2015 is just around the corner. In fact, I leave today for a week of jam-packed activities and networking. This networking involves my IBM colleagues, both existing ones and new ones I will meet for the first time, as well as customers.  I’m using the Event Connect app to schedule what sessions/receptions/other I want to attend as well as to remind me of where I need to be. Send me a network invitation and I’ll accept.  If you’re a developer, check out dev@Interconnect. I also plan to be tweeting during the conference. You can find me @rnjazz.

What do I plan to get out of the conference? I plan to learn as much as I can about Bluemix, Devops Services, Continuous engineering, and Devops (Steer, Develop-Test, Deploy, and Operate).  You can find most of the RTC and RQM sessions in the DevOps: Steer, Develop-Test, Deploy, Operate track. My favorite sessions are those given by adopters of CLM. It’s always great to hear how they rolled out CLM to their stakeholders.  If you’re a CLM administrator, be sure to check out Rational Deployment for Administrators track.  Ask the Experts sessions are also very informative. I recommend Ask the Experts on Rational DOORS Next Generation – 1067A if you use Rational DOORS Next Generation. Come with your questions ready! Another hot topic this year is configuration management, so I recommend this session with Brian Steele Configuration Management of Requirements in IBM Rational DOORS Next Generation – 2133A and Versioning and Collaboration in DOORS Next Generation Beta – 2987A with Vishy Ramaswamy.

Note: The links above all go to the Event Connect site for registered attendees to build their agenda.

I have a few sessions I am supporting this year.  Here is where I plan to hang out:

Saturday, Feb 21st

  • Internal IBM meetings at Mandalay Bay

Sunday, Feb 22nd

  • Internal IBM meetings & Inner Circle (formerly VoiCE)

Monday, Feb 23nd

  • 12:00 pm – 2:00 pm – dev@Interconnect Developer Playground, Speed Geeking demo: From Nothing to a Running App in the Cloud with IBM Bluemix DevOps Services with @jlmarechaux
  • Bluemix Reception, MGM Grand

Tuesday, Feb 24th

Wednesday, Feb 25th

I also encourage you to give back by stopping by the Stop Hunger Now! station at the Solution Expo and volunteering your time to help prepare nutritious meals for hungry kids all over the world. Registered attendees: Sign up and add this event to your schedule on Event Connect Feb 23, 2015, 8:00:00 AM – Feb 26, 2015, 1:00:00 PM

SCM Change Set History Replication and Migration with Rational Team Concert

Have you ever been asked to move your RTC development environment to another installation / deployment and wondered what will happen to all my existing SCM Change Set history? We know that Project Move and/or Copy has been a long requested feature on Jazz.net. So, I know I am only singling out SCM Change Set history as one of many items one would want to migrate as part of a RTC Project Move or Copy. Now, why did I have to even consider going through this?

I’m supporting an internal team that is adopting the Rational solution for Collaborative Lifecycle Management as part of their enterprise modernization effort. Some of the teams were already using RTC 3.0.1.x on an internal deployment site. But, the organization as a whole was not using a consistent set of tools which would help them achieve the benefits of collaborative lifecycle management(CLM). The organization decided to roll out CLM 4.0.6 on s separate internal deployment site and thus, begin to make use of the benefits of CLM. Teams with existing data in RTC 3.0.1.x (workitems, source control, requirements, attachments, etc) were going to need help migrating these artifacts to the new environment which is being set up with lifecycle projects. Workitem migration was accomplished using CSV files and RTC’s CSV export and import feature for CSV files. We even had an internal attachment migration utility that would help bring over the attachments of workitems which is not supported OOTB but can be done via the RTC API. So, enough background on the how I got to the SCM Change Set history migration question.

There is already an existing Jazz.net article that covers this to some extent, Flow changes cross repositories with Rational Team Concert. However, I quickly realized I didn’t need to do all of what the article discussed to accomplish my goal: Migrate change set history from one repository to another.

Procedure

The procedure I followed to complete this two phase change set history migration is as follows:

  1. Install a 3.0.1.x interim server running the default Tomcat and Derby deployment.
  2. Install a 3.0.1.x RTC eclipse client and connect to both source and target repositories.
  3. Migrate all the streams from source CCM server to target interim CCM server. Note: The fastest way to do this is to use stream to stream flow targets instead of repository workspaces. See Jazz.net library article 535 for details. I also would have liked to have tried the suggestion on how to migrate interim baselines but I ran into problem #2.
  4. Upgrade the 3.0.1.x interim server to 4.0.6
  5. Install a 4.0.6 RTC eclipse client and connect to both source and target repositories.
  6. Repeat step 3 to migrate all the streams on the interim source server to their final destination in the target server CCM project area.

Challenges

Some challenges did present themselves along the way which I will present below along with the workaround or solution.

Problem #1: Version Incompatibility of source and target servers

The first obstacle I ran into was the fact that each repository was at a different level and the article clearly mentioned that distributed SCM or what make change set replication cross repositories possible is not going to work from 3.0.1.x -> 4.0.6. See Appendix: Backwards Compatibility and Distributed SCM.

Workaround #1

Simply set up an interim server, migrate/replicate all the streams, manually, as outlined in the Jazz.net article, then upgrade the interim server to 4.0.6, and manually migrate/replicate all the streams to the target 4.0.6 server.

Problem #2 – Server to Server network connectivity

The next issue that I ran into was not being able to fully complete the replication of all the interim baselines during the first phase of the replication, 3.0.1.x to 3.0.1.x. Now, what does that have to do with server to server network connectivity? Well, RTC 3.0.1.x did not provide me much off a clue with its error logging. See workitem 315822. I proceeded to retrieve the baselines that I could which usually meant I could only retrieve the last baseline. It wasn’t until I went to complete the second phase that RTC client error logging gave me a better clue as to what was going on (with a little help from RTC SCM developers). I had a server network visibility issue. The interim server was behind a firewall and its public URI was also not known as part of the DNS of my network. Thus, the operations would fail with “unknown host” socket errors.

Workaround #2

What I was able to do may surprise you depending on how much you have read about how to properly set up the public URI of a CLM server. I was able to zip up the CLM install directory of my interim server installation and copy it to my laptop which is not behind a firewall. I then proceeded to unzip it and enter a local hosts file entry to map my IP address to the public URI hostname of the interim server.

Problem #3 – Insufficient JVM memory

When I had solved challenge #2, I proceeded with the second phase change set replication. The target server and the source server were now both at 4.0.6 level. However, when I tried to complete one of the first delivery or accepts, it would never complete. Change set replication goes through rounds to deliver the data. I followed the suggestions in the article regarding large replication sets. And still no complete delivery.

Workaround #3

A colleague suggested I increase the JVM memory of the source server. I changed the following default settings in the server.startup.bat first to 8G and then finally to 10G: -Xmx10G -Xms10G -Xmn1280M. This follows the suggestions to make the nursery 1/8 of the max and min values. Of course, I have enough memory to spare since my laptop has 16GB RAM. With these changes, the deliveries proceeded to complete.

Summary

In conclusion, it is possible to migrate SCMchange set history from a 3.0.1.x source server to a 4.0.x target server. It just takes a bit of patience and ingenuity. It is not necessary for both the servers to have a friend relationship. The only items needed are the following:

Special thanks to Ralph Schoon and Tim Feeney for their valuable suggestions.


ClearQuest Integration with Rational Adapter for HP ALM setup tutorial

I was recently asked to help with a customer request for the use case details on this integration. Although I have taught enablement sessions on the Rational Lifecycle Integration Adapters, I had never actually seen this integration in action. So, I got access to a ClearQuest test system and got busy setting up the integration. I am going to take you through what is required in order to set up the integration.

Prerequisites

  • Rational Adapter for HP ALM v1.1
  • Supported ClearQuest versions, see this link

Setup and Configuration

Establish Friend Relationship between ClearQuest Web Server and HP ALM Adapter

Use the procedure in this link

Once the procedure is complete, there should be a friend entry for the ClearQuest repository in the list.

Approve the access request from ClearQuest Web

Follow the procedure at this link

Establish Cross-Server Communication between CQ Server and HP ALM Adapter

Follow procedure at this link

Here are some screenshots of the procedure:

Establish project relationship between ClearQuest web server and HP ALM adapter

Follow the procedure at this link

Here are some screenshots of the procedure:

The service providers in this list represent all the projects that are visible by the HP ALM adapter using the user credentials provided at the login prompt. The login prompt for the HP Adapter is presented when the user selects the HP ALM Adapter in the Server dropdown. In my example, I set up a project relationship that supports ClearQuest change requests tested by HP ALM test cases. With this project relationship created, I now have three possible link relationships ( Affects Test Result, Blocks Test Execution Record, and Tested By Test Case) available on the Links tab of a ClearQuest change request during modification. Here is a screenshot.

Use Cases

Integrating ClearQuest records and HP ALM test cases

Note that there is one use case that allows for creation of HP ALM artifacts, namely test cases, and one use case that allows for creation of ClearQuest defects using the Rational Adapter for HP ALM web application.

For the use cases whose flow originates from HP, the user must open the HP artifact in the HP ALM adapter user interface in order to create the link. This can be accomplished using the toolbar button that is added to the HP project workflow during the HP ALM Adapter post-installation configuration.

For example, here is what an HP test case looks like in the HP ALM adapter user interface. It is on this view that you will find the ability to create a new ClearQuest change request or select an existing one to link to the HP test case.

CQHP10

Integrating ClearQuest records and HP ALM defects

Reference

Working with Rational ClearQuest and the Rational Adapter for HP ALM

Technote 1580379

Reporting view differences between RTC, RRC and RQM

Someone recently asked me this question: I am configuring Insight (or RRDI) with CLM 4.0.x.  When I open reports in RRC or RQM, I am taken to the report server URL. Is there a way to avoid this by importing custom reports into CLM? Can the reports be run from within CLM without being taken to the report server URL?

I get this question alot and I always have to spend some time remembering how this works.  The answer is that it depends on which product: RTC, RQM or RRC.  Thanks to my colleague, Geoff Rosenthal, for this explanation and screenshots.

RRC

The Reports view in the RRC Web UI can be invoked using the Welcome to Reports selection of the Reports menu.

20130830BlogPostPic1

  • RRC shares a similar Reports menu with the RTC and RQM web clients.
  • Unique to RRC is the Generate a Document-Style Report selection which invokes a Rational Reporting for Document Generation (RRDG) wizard.  This wizard only exists in RRC today.
  • The View Reports selection is only available **if** a custom reporting server has been connected to the RRC Jazz Team Server(https://<clm server>/jts/admin#action=com.ibm.team.reportsManagement.configureCustomReportsConnection)
    • The View Reports selection takes the user from the RRC Web client to the homepage for the connected report server.
    • This screenshot displays a RRDI report server. An Insight report server looks almost identical.

20130830BlogPostPic2

Note:  The report server requires credentials that are typically shared with CLM credentials (the Jazz Namespace).  Thus, a user who logs into CLM should also have access to the Report Server with the same credentials.  The user doesn’t have to re-enter their credentials to access the Report Server if the Jazz Namespace has been configured accordingly.  Note that a user can set their own desired homepage in the Report Server.

Currently, RRC does not provide a mechanism to view report server reports natively in the RRC Web UI.  Thus, to view reports, RRC users must navigate over to the Report server.What about viewing custom reports via a dashboard viewlet? It is possible to add a custom reports viewlet to a RRC dashboard which includes a report server template resource as defined in RTC or RQM.  Since RRC does not provide functionality to view Report server reports from within the RRC clients, these custom report viewlets must come from either the RTC or RQM widget catalogues.

RTC

Now, let’s look at the Welcome to Reports selection from the Reports menu of the RTC web client.

20130830BlogPostPic3

  • RTC shares a similar Reports menu with the RRC and RQM web clients
  • The View Reports selection will take the user to the RTC Shared Reports area for the current projects
  • The Create report from resource selection will take the user to the Report Resources area. The Report Resources area allows a RTC user to create a report resource (report template) from a report that was created with a report server using either Report Studio or Query Studio, RPE or other report template creation tools.
  • The Organize your Reports selection will take the user to the RTC My Reports area for the currently logged in user
  • The Perform additional reporting tasks selection is only displayed **if** a custom reporting server has been connected to your RTC Jazz team server (https://<clm server>/ccm/admin#action=com.ibm.team.reportsManagement.configureCustomReportsConnection)
    • The Perform additional reporting tasks selection will take the user from the RTC web client to the homepage on the connected report server, such as:20130830BlogPostPic4
    • This screenshot above is of a RRDI report server.  An Insight report server looks almost identical.
    • Note:  The report server requires credentials that are typically shared with CLM credentials (the Jazz Namespace).  Thus, a user who logs into CLM should also have access to the Report Server with the same credentials.  The user doesn’t have to re-enter their credentials to access the Report Server if the Jazz Namespace has been configured accordingly.  Note that a user can set their own desired homepage in the Report Server.

RQM

Lastly, let’s take a look at the Reports menu of the RQM Web client.

20130830BlogPostPic5

  • RQM does NOT have a Welcome to Reports selection
  • RQM shares a similar Reports menu with the RTC and RRC web clients
  • The Shared Reports selection will take the user to the RQM Shared Reports area.  This allows a RQM user to create a report resource (i.e. a report template) from a report that was created with the Report Server (either Query Studio or Report Studio), Rational Publishing Engine, or other report template creation tools.
  • The My Reports selection will take the user to the RQM My Reports area for the current user
  • The Perform additional reporting tasks selection is only displayed **if** a custom reporting server has been connected to your RQM Jazz team server (https://<clm server>/qm/admin#action=com.ibm.team.reportsManagement.configureCustomReportsConnection)
    • The Perform additional reporting tasks menu selection will take the user from the RQM client web page to their homepage for the connected Report Server, such as:

20130830BlogPostPic6

  • This is a screenshot of the Rational Reporting for Development Intelligence (RRDI) report server.  The Rational Insight report server looks almost identical to this screenshot.
  • Note that the Report Server requires credentials that are typically shared with CLM credentials (the Jazz Namespace).  Thus, a user who logs into CLM should also have access to the Report Server with the same credentials.  The user doesn’t have to re-enter their credentials to access the Report Server if the Jazz Namespace has been configured accordingly.  Note that a user can set their own desired homepage in the Report Server.

Getting started with a Rational Team Concert (CLM) deployment

I recently had to put together a quick “how-to” get started list of material regarding deploying Rational Team Concert v4.0.2 in a single server department topology with WAS and DB2.   In addition, there was a request to include a reverse proxy and IHS plugin to the topology.  This list applies to any CLM product: RTC, RRC, or RQM.

I wanted to share the list of references I compiled.

CLM 2012 Deployment Guide <–Overall guide that touches at a high level the points mentioned below.

1) First and foremost, I would read the Planning to deploy and Install topic in our infocenter: http://pic.dhe.ibm.com/infocenter/clmhelp/v4r0m2/topic/com.ibm.jazz.install.doc/topics/c_planning_install.html

It includes information on topology planning including reverse proxies: http://pic.dhe.ibm.com/infocenter/clmhelp/v4r0m2/topic/com.ibm.jazz.install.doc/topics/c_reverse_proxy.html

2) Regarding WAS, here is the parent topic: http://pic.dhe.ibm.com/infocenter/clmhelp/v4r0m2/topic/com.ibm.jazz.install.doc/topics/c_deploying_was.html

Notice the topic on configuring a reverse proxies using IHS: http://pic.dhe.ibm.com/infocenter/clmhelp/v4r0m2/topic/com.ibm.jazz.install.doc/topics/t_config_reverse_proxy_ihs.html

The above topic includes the links to two Jazz.net articles written as a how-to for reverse proxy configuration. They were written for 3.0.1 but they still apply for 4.0.x.

Configuring Enterprise CLM Reverse Proxies, Part 1: Understanding Reverse Proxy

Configuring Enterprise CLM Reverse Proxies, Part 2: WebSphere and IHS Plugin method

Notice the topic about the Jython script vs Admin console approach for deployment of CLM on WAS.

The entire section on deploying on WAS should be read as it also discusses single Signon.

This article discusses deploying on WAS+IHS when JTS and CCM are on separate app server profiles: https://jazz.net/library/article/1192

3) There is a patch needed when using  BIRT reports on dashboards and WAS 8.0.0.x, see workitem 261100

4) Regarding DB2, here is the link to the Setting up the databases topic for DB2: http://pic.dhe.ibm.com/infocenter/clmhelp/v4r0m2/topic/com.ibm.jazz.install.doc/topics/t_s_server_installation_setup_db2.html

I usually follow the steps here before deploying on the app server and subsequently running the setup wizard.

5) The infocenter now provides a feature called an Interactive Install Guide where you can specify the details of your environment and it will generate a step by step guide. This is good to read after first glance at all the individual topics because it pulls it all together for you in sequential format. http://pic.dhe.ibm.com/infocenter/clmhelp/v4r0m2/topic/com.ibm.jazz.install.doc/topics/roadmap_form.html

6) In case you did not already know, you cannot change the public URI of CLM applications, at least not without a server rename as of v4.0.x, so, please read the information regarding how to choose an appropriate public URI.  http://pic.dhe.ibm.com/infocenter/clmhelp/v4r0m2/topic/com.ibm.jazz.install.doc/topics/c_planning_URLs.html

7) For your reference, here is the System Requirements article for CLM 4.0.2: https://jazz.net/library/article/1109 CLM 4.0.3 updates are in draft mode here: https://jazz.net/wiki/bin/view/Deployment/CLMSystemRequirements

8) I perused the Jazz.net library for articles related to deployment. Here is a list of ones are I found useful.

http://www.ibm.com/developerworks/rational/library/create-server-side-certificates-collaborative-lifecycle-management/index.html?ca=drs-

https://jazz.net/library/article/1258

https://jazz.net/library/article/1143

9) CLM Administration workshop https://jazz.net/library/article/831/ This workshop is a MUST for anyone planning and implementing a deployment of any CLM application.  In this workshop, we take the student from an eval topology to a department or enterprise topology, and demonstrate how to install/configure a reverse proxy and move to WAS+DB2+LDAP. This material was developed using CLM 4.0.

10) For questions regarding backups, here is an article to have around: https://jazz.net/library/article/795

11) TIP: Whenever you are re-directed to an infocenter link such as ones that start with pic.dhe.ibm.com/infocenter/clmhelp, you can always make sure you are reading the latest, if you substitute v4r0m2 instead of v4r0 or v4r0m1.

12) Tuning the Rational Team Concert 4.0 server

13) Collaborative Lifecycle Management 2012 Sizing Report (Standard Topology E1)

14) Youtube playlist for Install: http://www.youtube.com/playlist?list=PLZGO0qYNSD4W3XDwY59GybtiwVd01YRe0

15) Guide to better performance for Jazz applications is a blog post by Dan Toczala that captures many performance related best practices for CLM deployments.

Join Jumpstart at Innovate 2013 in Orlando, FL June 2-6

Innovate 2013, The IBM Technical Summit is just around the corner.  It will be held June 2-6 in Orlando, FL in the beautiful Walt Disney World Swan and Dolphin conference center.  I’ll be there this year delivering two talks in the Requirements Management and Rational Deployment for Administrators track. Most of my Jazz Jumpstart colleagues will also be there delivering timely topics and workshops ranging from Customizing RTC to Jazz HA/DR Best Practices to Maximizing Jazz Performance.

Here is a handy table you can use to find our sessions.

Speakers Session Title Session Date/Time/Location
Rosa Naranjo / Gerald Mitchell / Paul Ellis RDA-1481 Strategies for Planning and Completing Successful CLM Upgrade 4:15-5:45pm Tues, June 4th Swan 9
Rosa Naranjo / Brian Steele RM-1174 Using OSLC to Extend your Development Tools (Requirements Composer Perspective) 4:15-5:45pm, Wed, June 5th Dolphin Northern E2
Gary Cernosek / Kevin  Bauer / Robin Yehle / Rosa Naranjo WKS-2208 Integrating with Third-party Tools Using Rational Lifecycle Integration Adapters 2:00-6:00pm, Mon, June 3rd Swan 7
Ralph Schoon / Jorge Diaz CCM-1629 All You Need to Know About Customizing RTC 8:30-9:30 am, Thur, June 6th Dolphin Southern 3
Ralph Schoon / Fariz Saracevic RDA-1051 IBM Rational Collaborative Lifecycle Management Solution Deployment Tips and Tricks 11:00-12:00pm, Thur, June 6th Swan 9
Jim Ruehlin / Ralph Schoon / Jorge Diaz WKS-1116 CLM Process Enactment workshop 3-6pm, Tues, June 4th Swan 8
Grant Covell RDA-2485 Jazz HA/DR Best Practices 1:45-2:45 pm, Tues, June 4th Swan 9
Grant Covell, Dan Toczala RDA-1327 Maximizing Jazz Environment and Performance 4;15-5:45 pm, Wed, June 5th Swan 9
Jorge Alberto Diaz Garcia SZ-1203 Building Mainframe Applications with RTC 9:45-10:45 am, Thu, June 6th Dolphin Northern E2

Swan Conference Map

Dolphin Conference Map

 Innovate2013_REG-learn_300x100_03-18-13

Upgrade Alert! License package changes affect some upgrade scenarios

Overview

There was a change made in how the various CLM app-specific functional Client Access licenses (CAL) are packaged in CLM v4.0.1 which has caused a problem for staged upgrades to v4.0.1 or greater from versions 3.0.1.x or 4.0 in distributed environments.   A staged upgrade is the kind that we have always recommended and it means if you have multiple CLM applications, you should upgrade them one at a time.  The issue along with the workaround is described in detail in this workitem:  Incorrect documentation for upgrading JTS and apps in a staged fashion when going from pre-4.0.1 to post 4.0.1 CLM release (251460)

Basically, there are functional app-specific CALs such as the CCM Data Collector, QM Data Collector, RQM Connector, Build System, CQ Synch, and CC Synch that used to be packaged with the Required Base License Keys Including Trials package that was installed by Installation Manager along with the JTS and the CLM server packages prior to v4.0.1.  In version 4.0.1, a change was made to rename this license package as well as to move these app-specific functional CALs to be contributed by their respective CLM server applications.  For example, the CCM Data Collector, CQ Synch, Build System and CC Synch CALs are now being contributed only when the CCM (4.0.1 or greater) server package is installed.  Thus, let’s say that you are planning an upgrade from v3.0.1.4 to CLM v4.0.1 and have a distributed CLM deployment with a JTS, CCM and a QM application.  You start by staging an upgrade of just the JTS and CCM applications.  So, you install the JTS and CCM 4.0.1 install in their respective locations so that you can perform a side by side upgrade.  In v4.0.1, the license package is called Trial Keys for Collaborative Lifecycle Management Products.  It only contains the Trial licenses.  The other licenses needed are now contributed by the applications themselves.  Thus, if you upgrade only JTS and CCM to v4.01 and leave QM at v3.0.1.4, you will have some license assignments that refer to licenses that no longer exist such as the QM Data Collector or RQM Connector.  This is because QM is still at v3.0.1.4 and these licenses will not be provisioned until QM is upgraded to v4.0.1.  If you upgrade all the apps at once, this is not an issue.  This is only an issue for staged upgrades.

What is being done about this problem?

A zipfile containing all of the 4.0.x functional CALs is being made available via workitem 251460 above that can be installed via the JTS Admin web UI after the JTS is upgraded.  This will allow these functional CALs to be persisted in the database.  At the time you subsequently upgrade any of the apps such as CCM, QM or RM, all the functional CALs associated with the application would need to be deleted.  This is necessary so that the new CALs contributed by the upgraded app will take effect rather than the ones persisted in the database.

Why do we need to install these 4.0.x functional CALs in the first place?

These functional CALs are assigned to functional users.  Since they are now contributed by the applications, once the JTS is upgraded, the older functional CALs are removed so you end up with functional user CAL assignments to licenses that do not exist.  This causes problems with the operation of the non-upgraded applications.

Why do we need to delete these 4.0.x functional CALs prior to upgrading a particular application?

If they are not deleted, then these functional CALs persisted in the database repository will take precedence over any CALs contributed by the upgraded app.  This is not the state we want to have.

Getting Started with Rational Lifecycle Integration Adapter for GIT

I recently had the opportunity to help some of our client technical professionals overseas get familiar with the Rational Lifecycle Integration Adapters (RLIA) – Standard Edition.  This included some install and configuration sessions and some exercises to help them understand the key features.  But, I was missing some information on how to install and configure the GIT Adapter.  It is documented in the RLIA v1.0 infocenter, but sometimes it’s better to see it broken down into some simple steps with notes and then run through it oneself.  So, that’s what I did when I got back to the office.  I just had to see how to get to the point where RTC and GitWeb were integrated.

I’ll take you through what I did to get RTC 4.0.1 and GitWeb integrated such that I could link Git commits with RTC workitems.

Environment

Windows 7 64-bit

CLM 4.0.1 deployed on Tomcat with a Derby database and the Money that Matters sample.

CLM 4.0.1 public URI is set to https://clm.jkebanking.net:9443/jts

GitWeb 1.7.1 running on a Linux VM image

DB2 Workgroup Server Edition, v9.7

Note:

  • Administrator privileges are required to install the adapter.
  • If your CLM 4.0.1 public URI does not contain a port, please contact IBM support to obtain a hotfix for the Rational Adapter for Git that will work in your environment.

Installation and Configuration

The Git adapter needs to be installed into the same location as Jazz Team Server (JTS).  For example, if you want to integrate with a specific instance of the RTC 4.0.1 application, you need to figure out what JTS that RTC 4.0.1 application is registered with.

I started by running the Interactive Installation guide located here:  http://pic.dhe.ibm.com/infocenter/rliahelp/v1/topic/com.ibm.rational.rlia.git.install.doc/topics/roadmapgit_form.html

  1. Create a DB2 database using the instructions here:  http://pic.dhe.ibm.com/infocenter/clmhelp/v4r0/topic/com.ibm.jazz.install.doc/topics/t_s_server_installation_setup_db2.html
  2. Stop the CLM 4.0.1 server.
  3. Locate the Rational Lifecycle Integration GIT Adapter install directory, GIT\disk1, of the installation media.  Run launchpad.exe to install the adapter into the same application server instance as the JTS.
  4. After adapter install completes, start the CLM 4.0.1 server.

What we have done so far is (1) installed the adapter to the same application server as the Jazz Team Server, and (2) set up the database to use with the adapter.  Now, we want to register the Rational Adapter for Git application with the JTS.  This part is pretty straightforward if you have configured CLM before.  Here’s a link that covers this next step:  http://pic.dhe.ibm.com/infocenter/rliahelp/v1/topic/com.ibm.rational.rlia.git.install.doc/topics/t_register_git.html

When I ran through this part, I got a message during Step 7 regarding having to upgrade the data warehouse. I skipped this step by selecting the checkbox, ‘I do not want to configure a data warehouse at this time’.  Development said it was ok to do this and that this was not the expected behavior. It should have just worked.  In Step 5, I also let it create a default functional user, gitAdapter_user.

After the adapter application is registered, we can proceed to configure linking between the RTC application and the Rational Adapter for Git.

The next part consists of the following areas:

  • Establishing cross-server communication
  • Approving the access request
  • Deploying the Gitweb additions
  • Registering the Gitweb server
  • Registering the Gitweb project

Establishing cross-server communication

This part is pretty straightforward. It involves establishing a friend relationship between the Rational Adapter for Git and RTC.

  1. Follow the process described in this topic:  http://pic.dhe.ibm.com/infocenter/rliahelp/v1/topic/com.ibm.rational.rlia.git.install.doc/topics/t_servertoserverestablish_gittojazz.html  HINT: Use a meaningful name for the friend relationship so that you can identify it easily later on in this process.  I used this name: GIT clm.jkebanking.net
  2. Open the JTS Admin page in a browser.
    1. Create a user called ‘githook’.
    2. Apply a RTC Contributor Client Access License (CAL).
    3. Add this user as a member of the RTC projects that you want to integrate with Git using this adapter.

Approving an access request

This part can be automatic if you are logged in as a CLM Administrator like I was.  You get the option to grant provisional access.  However, there is a part that is not quite documented well and is mentioned in passing in Step 7.  It discusses a functional user ID that needs user privileges to update workitems and permissions in the RTC project area that will be used by this integration. But, it is the first time this is mentioned.  That is the reason I had you create a user, ‘githook’ in the previous section.

http://pic.dhe.ibm.com/infocenter/rliahelp/v1/topic/com.ibm.rational.rlia.git.install.doc/topics/t_approve_consumer_keys_git.html

  1. Open the CCM Admin page in a browser, for example, using a URL such as :  https://clm.jkebanking.net:9443/ccm/admin using an account with administrator privileges.
  2. Navigate to the Consumers (Inbound) page.
  3. Locate the consumer relationship in the Authorized Keys section.
  4. Follow steps 6 and 7 of the infocenter topic listed above to add the githook user to this consumer key.  Note: There is no functional user associated with this inbound consumer. This is where we want to add the ‘githook’ user we created earlier.

Deploying GitWeb additions

This part is done where GitWeb is installed.  The GitWeb additions add a banner to the GitWeb interface that supports: (1) the creation of links between commits and RTC workitems, (2) traversal of existing links and (3) rich hover support of existing links.

http://pic.dhe.ibm.com/infocenter/rliahelp/v1/topic/com.ibm.rational.rlia.git.install.doc/topics/t_deploy_gitweb_additions_git.html

  1. Follow the instructions in the topic above.
  2. In Step 4, follow the suggestion to copy/paste the contents of gitweb.conf.README to the gitweb.conf file for your installation.

Once this section is complete, you should see the following banner when opening GitWeb.

Image

Registering the Gitweb server

Now that we have the Rational Adapter for Git banner installed, we will use it to register the Gitweb server with the adapter.  This step will allow to the Gitweb server to be recognized by Gitweb objects.

Follow the steps in this topic:  http://pic.dhe.ibm.com/infocenter/rliahelp/v1/index.jsp?topic=%2Fcom.ibm.rational.rlia.git.install.doc%2Ftopics%2Ft_deploy_gitweb_additions_git.html

Make sure to follow Step 6 which further updates the ./static/oslcConfig.js file.

Registering the Gitweb project

We can now finish the configuration by registering one or more Git projects with the Rational Adapter for Git.

Follow the steps in this topic:  http://pic.dhe.ibm.com/infocenter/rliahelp/v1/topic/com.ibm.rational.rlia.git.install.doc/topics/t_register_git_project_git.html

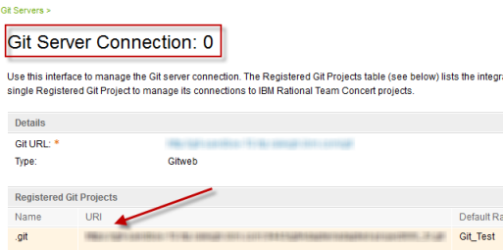
Take a note of Step 8.  If you want to configure the ‘commit hook’ piece of the integration, you will need to record the Gitweb project URI.  You can retrieve this Gitweb project URI at a later time however by going to the Git Adapter Appication Administration page (https://<publicURI>/gitAdapter/admin) and selecting the Git Server connection entry ID hyperlink.

Image

Image

Validate the Gitweb integration

Once the above steps are complete, we can validate the Gitweb integration by following the usage in this topic:  http://pic.dhe.ibm.com/infocenter/rliahelp/v1/topic/com.ibm.rational.rlia.git.doc/topics/c_git_use_gitweb_ovw.html

Conclusion

We have now completed one part of the Rational Adapter for Git installation and configuration.  With this integration, we can link existing commits to either existing Rational Team Concert change requests or new change requests.  There is another integration that is supported by the Rational Adapter for Git.  It uses the Git command line to create links between a Git commit and a change request in RTC via the command line.  I will be looking at this next.  If there is anything tricky, I will create another blog post.  In the meanwhile, you can access the deploy instructions in this topic:  http://pic.dhe.ibm.com/infocenter/rliahelp/v1/topic/com.ibm.rational.rlia.git.install.doc/topics/t_deploy_git_receive_hook_git.html

RDz – RTC Compatibility

In this post, I want to outline the RDz considerations to keep in mind when upgrading RTC from 3.x to 4.0.

The information below is applicable to the following releases:

  • RTC 3.0, 3.0.1, 3.0.1.x, 4.0
  • RDz: 8.0.3.x, 8.5

Definitions

RTC

Eclipse client:

This is the Eclipse based client that can be shell shared with the RDz Eclipse client. For the two products to interact they need to shell share.

Server:

This is the server piece of the CLM product (in which RTC is an application along with RQM and RRC). The server can run on various different platforms and the clients connect to it via a web browser or an eclipse IDE.

Build Toolkit:

This is part of the RTC product that is installed on the platforms that code needs to be built on.  In the case of mainframe development, it is installed on the zOS system.

RDz

Eclipse client:

This is the Eclipse based client that can be shell shared with the RTC Eclipse client. Obviously for the two products to interact they need to shell share.

RDz server side code:

This is code that must be installed onto the z/OS system so that the RDz client can talk to it. There are various parts to this such as the RSE (Remote System Explorer) that enables the RDz client to interact with the z/OS file system. There is also the Job Monitor that allows RDz to get notification on jobs running on the z/OS system. This enables a job to be submitted via the RDz Eclipse client and the Eclipse client being able to monitor the job and report back its status.

RTC/RDz Integration – What is it exactly?

The integration is achieved by first installing the two clients using shell sharing. Shell sharing means that they can coexist but there is no specific targeted integration yet between the two products. One can use the RTC functionality and the RDz functionality in the same client but there is no specialized integration going on. What is available from RTC 2.0 and onwards is some meaningful integration between the two clients. This is provided via an installable feature that is shipped with the RDz product. It is the ‘glue’ that allows the RDz Eclipse client and the RTC client to become aware of each other and work together.

With RDz 8.5, there is a change with the API that RTC uses to communicate with RDz (i.e. the API changed). Thus, there are two RTC/RDz Integration features shipped with RDz 8.5. One allows RTC 4.0 to talk with RDz 8.5 and the second one allows RTC 3.x to talk with RDz 8.5. Based on the version of the RTC client, pick the correct integration feature to install in your environment.

Now, what integrates with what exactly?

Clients

The only combination of clients that will NOT work is RTC 4.0 + RDz 8.0.3.x. Another way to say this is that RTC 4.0 pre-req’s RDz 8.5 if you want to use the integration feature. All other combinations work and have been tested either by RTC test team or by the RDz test team.

RDz Server side code (mainframe)

  • The RSE shipped with RDz 8.0.3.x will work with RTC 3.x and 4.x
  • The RSE shipped with RDz 8.5 will work with RTC 4.x

RTC server compatibility

There is N-1 client compatibility.  Thus, an RTC 3.x client will work with an RTC 4.0 server and obviously a RTC 4.0 client will not work with a RTC 3.x server

Build Toolkit

We recommend the following combinations of client and build tool kit combinations when the server has been upgraded to RTC 4.0

  • RDz 8.0.3.x client + RTC 3.x client would use RSE + build tool kit 3.x
  • RDz 8.5 client + RTC 4.x client would use RSE + build tool kit 4.x

I’m upgrading my RTC environment(clients and server) to 4.0, what do I have to upgrade?

On the client side, you will need to upgrade the RDz clients from 8.0.3 to 8.5 and use the RTC/RDz integration feature provided shipped with RDz 8.5.

On the server side, specifically the RSE, the 4.0 RTC / RDz 8.5 client integration will work with the RDz 8.0.3.x RSE. Naturally, any server-side dependent features for 8.5 will not work, so the user is restricted to 8.0.3 functionality for anything that is related to server side function.

Additionally, on the server side, there may be build toolkits installed. Any 3.x RTC client should continue to use a 3.x build toolkit.  Any 4.0 RTC client should use a 4.0 build tool kit.